If you have two or more machines, you may wish to share disk space or devices, such as a CD drive, between machines. For this there is network filesystem (NFS), the easiest way of sharing files and resources across a network.
NFS is the way of working with files on a remote machine as if they are on your local one. NFS is the standard de facto solution to access the same $HOME directories from any machine on the Net. Using it also is a good way to avoid keeping duplicated information from eating large amounts of disk space.
NFS originally was introduced by engineers at Sun Microsystems in 1985. Quite ancient, but still good, NFS continues to experience improvements. Sun is working on producing an NFS version 4 implementation for Linux that is now in the development stage.
The standard version of NFS for Linux is 3. This article deals with this version. From an ordinary user's point of view, there are only few differences between versions.
Installing NFS both on the client and the server sides is not so hard. We show some basic NFS features and explain their use. Many commands have to be executed as root, so think 37 times before pressing Enter.
But first, how NFS works. NFS is the most-known service using remote procedure call (RPC). As an example, let's say a server machine, named tiger, keeps all $HOME files in the directory /home. From your local machine, named blackcat, you would issue the command:
When a user on blackcat tries to access a file on NFS, the kernel makes an RPC call to the NFS dæmon, usually rpc.nfsd, passing as parameters the name of the file, user and group ID (uid and gid). Thus the server, tiger, can prevent unauthorized access before sending the file handle. The process of mounting is shown in Figure 1.

NFS is the way of working with files on a remote machine as if they are on your local one. NFS is the standard de facto solution to access the same $HOME directories from any machine on the Net. Using it also is a good way to avoid keeping duplicated information from eating large amounts of disk space.
NFS originally was introduced by engineers at Sun Microsystems in 1985. Quite ancient, but still good, NFS continues to experience improvements. Sun is working on producing an NFS version 4 implementation for Linux that is now in the development stage.
The standard version of NFS for Linux is 3. This article deals with this version. From an ordinary user's point of view, there are only few differences between versions.
Installing NFS both on the client and the server sides is not so hard. We show some basic NFS features and explain their use. Many commands have to be executed as root, so think 37 times before pressing Enter.
But first, how NFS works. NFS is the most-known service using remote procedure call (RPC). As an example, let's say a server machine, named tiger, keeps all $HOME files in the directory /home. From your local machine, named blackcat, you would issue the command:
mount -t nfs tiger:/home /homeAccording to this command, mount will try to connect to the rpc.mountd dæmon on server tiger via RPC. The server will check if the request is permitted to mount /home from blackcat and return a file handle that in turn may be used to serve all requests to files below /home. If the request is not permitted, we will see the corresponding diagnostic message. Note that the colon in the command indicates the filesystem is remote, so -t nfs may be omitted. Let's imagine the file handle was returned successfully, and we are dealing with a kind tiger.
When a user on blackcat tries to access a file on NFS, the kernel makes an RPC call to the NFS dæmon, usually rpc.nfsd, passing as parameters the name of the file, user and group ID (uid and gid). Thus the server, tiger, can prevent unauthorized access before sending the file handle. The process of mounting is shown in Figure 1.

Figure 1. Mounting Process
If you want to have your Linux machine acting as the NFS server, you have to run the rpc.mountd program there. This program helps the stage of mounting and passes mount-NFS requests to the rpc.nfsd program, which does almost all work and acts as the NFS server. RPC protocol also defines using performance statistics from the kernel on the serving machine, which in turn helps in working with rpc.lockd and rpc.rquotad. Since kernel 2.2.18, rpc.lockd is evoked by rpc.nfsd on request and thus may not be started manually. The rpc.rquotad program has to be started in order for quota service to work on NFS.
As you remember, we mentioned RPC. This means that for NFS to connect we do not need to change /etc/inetd.config for the program that rules the internet super server, inetd. NFS uses another program, portmapper, which shows the way to find all NFS services on the system.
The very first guard to protect your machine from everlasting net requests uses a pair of files, /etc/hosts.allow and /etc/hosts.deny, to allow the requests to be processed or rejected. This guard recognizes two things: the type of request and the host that sends it. Then it has a look at the file hosts.allow to find those parameters. If found, the request will pass. If not, the guard sees /etc/hosts.deny, and the inquiry is rejected if the pair matches. If the pair does not match either /etc/hosts.allow or /etc/hosts.deny, the request will be passed.
If you are setting the server, say, for an educational establishment, you have to pay more attention to security. In any such establishment there is, for instance, “the fifth column”, usually from students: one part is sniffing your passwords and other sensitive information, the second one is sending “I love you” e-mails, the third gifts you with Trojan horses. NFS, especially its old releases, has a set of features with potentially low-security levels. So, better to set up these files correctly.
To find out more about these files, consult hosts_access in man page section five. But, it is usually enough to forbid access to portmapper and other NFS requests for all machines, and allow demands for particular hosts or subnets. So, in the file /etc/hosts.deny you need to put these rows:
To this point, we mentioned only common features that apply to many net services. The config file for NFS service, /etc/exports, is more specific. On those two machines of the cat family, blackcat and tomcat, mount /home and /usr/doc directories via NFS:
If we look at the situation with root carefully, we also will deduce that we should do something with user and group identification numbers: uid and gid. If a user has different uid and gid on a client and on the server, the user may not access fully his or her own files, but may access files belonging to another user.
To avoid this situation, you may set the file to indicate static mapping for uid/gid. In the example below, the option points to the file /etc/nfs/home_map.cats and may look like this:

If you have an NIS system running, the NFS server may use it to consult on uid/gid. In this case you should use another option, map_nis=kingdom.cat. This solution is more clever; the NFS server will obtain the corresponding information from the NIS domain kingdom.cat.
To allow mount process for a group of trusted users described in your NIS system, you may use the parameter @group. If you put, say @catowners, only the host part of all members of the group catowners is extracted to add to the access list.
Having those files correctly installed, you should then start the corresponding programs. Because NFS uses portmapper, portmapper should be run first. In recent distributions of Linux, portmap or rpc.portmap starts while the system is booting. You may check the current status of the program by issuing the following two commands in one line:
Having run the portmapper, you can start the needed dæmons: rpc.mountd, rpc.nfsd, rpc.statd, rpc.lockd and rpc.quotad. These dæmons must be started in exactly this sequence. Modern distributions (we have checked Debian 2.2r3, Red Hat 7.1 and SuSE 7.0) have start/stop scripts for the services. If you have trouble finding such scripts, you may take a ready-made one from a SuSE or Red Hat distribution and correct it by hand, or write your own.
In general, rpc.rquotad is needed only if you use the quota system to limit disk space for the users. In recent versions of the kernel, rpc.lockd is called by rpc.nfsd on request but starting it from the script is okay.
After starting all those programs, execute the command rpcinfo -p. The output of this command shows what programs are running currently, their versions and other useful information. At least portmapper, mountd and nfsd must be running to enable you to use the NFS server. If you have any problems, you can find help in the Linux NFS-HOWTO document.
As you remember, we mentioned RPC. This means that for NFS to connect we do not need to change /etc/inetd.config for the program that rules the internet super server, inetd. NFS uses another program, portmapper, which shows the way to find all NFS services on the system.
The very first guard to protect your machine from everlasting net requests uses a pair of files, /etc/hosts.allow and /etc/hosts.deny, to allow the requests to be processed or rejected. This guard recognizes two things: the type of request and the host that sends it. Then it has a look at the file hosts.allow to find those parameters. If found, the request will pass. If not, the guard sees /etc/hosts.deny, and the inquiry is rejected if the pair matches. If the pair does not match either /etc/hosts.allow or /etc/hosts.deny, the request will be passed.
If you are setting the server, say, for an educational establishment, you have to pay more attention to security. In any such establishment there is, for instance, “the fifth column”, usually from students: one part is sniffing your passwords and other sensitive information, the second one is sending “I love you” e-mails, the third gifts you with Trojan horses. NFS, especially its old releases, has a set of features with potentially low-security levels. So, better to set up these files correctly.
To find out more about these files, consult hosts_access in man page section five. But, it is usually enough to forbid access to portmapper and other NFS requests for all machines, and allow demands for particular hosts or subnets. So, in the file /etc/hosts.deny you need to put these rows:
portmap:ALLAfter this action, nobody can access your NFS server, and of course this is not what we need, so let us also change the /etc/hosts.allow file. The common format for the lines in the file look like this:
lockd:ALL
mountd:ALL
rquotad:ALL
statd:ALL
daemon list : ... user pattern@host patternFor example, in order to allow using NFS for machines blackcat and tomcat with IP addresses 192.168.16.13 and 192.168.16.24, respectively, we have to add the corresponding lines in /etc/hosts.allow file for all services that we disabled:
portmap : 192.168.16.13 192.168.16.24If you are using an NFS connection with a set of clients that usually occupies a continuing subnet and so have the corresponding addresses in the range, the row with allowed hosts may be too long. To simplify, there is another way of pointing to such a set of clients: in this case address/netmask is used, for it makes the files shorter and more readable. For example, 192.168.16.0/255.255.255 matches all IP addresses in the range 192.168.16.0 to 192.168.16.255.
lockd : 192.168.16.13 192.168.16.24
mountd : 192.168.16.13 192.168.16.24
rquotad : 192.168.16.13 192.168.16.24
statd : 192.168.16.13 192.168.16.24
To this point, we mentioned only common features that apply to many net services. The config file for NFS service, /etc/exports, is more specific. On those two machines of the cat family, blackcat and tomcat, mount /home and /usr/doc directories via NFS:
/home 192.168.16.11(rw,root squash)The format is clean; in the left field we put the name of the directory to export and then enumerate pairs host(permissions). Note: there is no space after the IP address. In the example above we may write and read in /home, and only read /usr/doc and subdirectories. The parameter root_squash is needed to protect files from client root access. This means that a user (say, a student), after having successfully cracked the client root password, may become root but still cannot access or change files that only root on the server can. This is good, and the option is set by default. The word squash means that the root user will have the same access as user nobody.
192.168.16.24(rw)
/usr/doc 192.168.16.11(ro,root squash)
192.168.16.24(ro)
If we look at the situation with root carefully, we also will deduce that we should do something with user and group identification numbers: uid and gid. If a user has different uid and gid on a client and on the server, the user may not access fully his or her own files, but may access files belonging to another user.
To avoid this situation, you may set the file to indicate static mapping for uid/gid. In the example below, the option points to the file /etc/nfs/home_map.cats and may look like this:
map_static=/etc/nfs/home map.catsThe file for mapping, home_map.cats may look like this:
# Mapping for cat's machines:The process of communication between dæmons both on the server and client is shown in Figure 2.
# server client
uid 0-60 - # switch to nobody
uid 61-80 41 # map 61-80 into 41-60
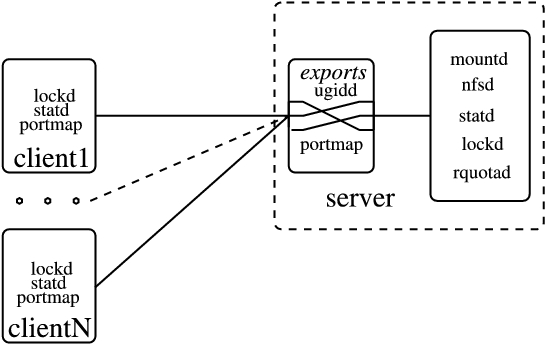
Figure 2. Communication between Dæmons
If you have an NIS system running, the NFS server may use it to consult on uid/gid. In this case you should use another option, map_nis=kingdom.cat. This solution is more clever; the NFS server will obtain the corresponding information from the NIS domain kingdom.cat.
To allow mount process for a group of trusted users described in your NIS system, you may use the parameter @group. If you put, say @catowners, only the host part of all members of the group catowners is extracted to add to the access list.
Having those files correctly installed, you should then start the corresponding programs. Because NFS uses portmapper, portmapper should be run first. In recent distributions of Linux, portmap or rpc.portmap starts while the system is booting. You may check the current status of the program by issuing the following two commands in one line:
ps axu | egrep portmapIf the portmap is running, you will see something like this:
daemon 99 0.0 0.3 1132 500 ? S Jul11 0:02The first line here informs that portmap is running. If portmapper is not running, you should try to run it manually. The program usually is located in /sbin, but if not, try /usr/sbin. If the program is not available, you have to install it. The name of the package to install may be something like netbase or nkitb.
/sbin/portmap
tiger 27837 0.0 0.3 1264 492 pts/0 R 17:03 0:00
egrep portmap
Having run the portmapper, you can start the needed dæmons: rpc.mountd, rpc.nfsd, rpc.statd, rpc.lockd and rpc.quotad. These dæmons must be started in exactly this sequence. Modern distributions (we have checked Debian 2.2r3, Red Hat 7.1 and SuSE 7.0) have start/stop scripts for the services. If you have trouble finding such scripts, you may take a ready-made one from a SuSE or Red Hat distribution and correct it by hand, or write your own.
In general, rpc.rquotad is needed only if you use the quota system to limit disk space for the users. In recent versions of the kernel, rpc.lockd is called by rpc.nfsd on request but starting it from the script is okay.
After starting all those programs, execute the command rpcinfo -p. The output of this command shows what programs are running currently, their versions and other useful information. At least portmapper, mountd and nfsd must be running to enable you to use the NFS server. If you have any problems, you can find help in the Linux NFS-HOWTO document.
No comments:
Post a Comment